Logic App workflow that retrieves JSON data from an HTTP request and converts it into a CSV format
Creating a Logic App workflow to convert an HTTP JSON request into a CSV table involves several steps. Below is a step-by-step guide with a detailed explanation and example.
Scenario
- You receive an HTTP POST request with JSON data.
- You parse the JSON data.
- You convert the JSON data into a CSV table.
- You send it as an email attachment.
Step-by-Step Workflow
Step 1: Create a Logic App
- Go to the Azure portal.
- Click on Create a resource > Integration > Logic App.
- Provide a name, subscription, resource group, and location for your Logic App.
- Click Review + create and then Create.
Step 2: Add an HTTP Trigger
- Open your Logic App in the designer.
- Search for the HTTP Request trigger and add it.
- Save the Logic App. This will generate a URL for the HTTP endpoint.
- Copy the URL for testing later.
Step 3: Parse JSON Data
- Add a new action after the HTTP trigger.
- Search for Parse JSON and add it.
- In the Content field, select the Body from the HTTP trigger.
- Provide a JSON schema for the incoming data. For example:
{
  "type": "array",
  "items": {
    "type": "object",
    "properties": {
      "id": { "type": "integer" },
      "name": { "type": "string" },
      "email": { "type": "string" }
    }
  }
}
This schema assumes the incoming JSON is an array of objects with
id,name, andemailfields.
Step 4: Create a CSV Table
- Add a new action after the Parse JSON action.
- Search for Create CSV table and add it.
- In the From field, select the output of the Parse JSON action.
- Specify the columns for the CSV table. For example:
- Column 1: I
d - Column 2: N
ame - Column 3: E
mail
- Column 1: I
Step 5: Send the CSV File
- Add a new action after the Create CSV table action.
- Search for Gmail (or your email provider) and select Send email (V2).
- Connect to your email account.
- Fill in the email details (To, Subject, Body).
- In the Attachments section:
- Add the Create CSV table output as the attachment content.
- Specify a file name (e.g.,
data.csv).
Here's how Logic App should look:
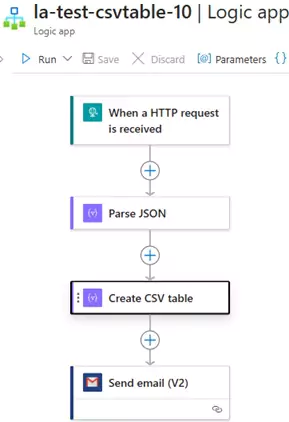
Example Workflow
- HTTP Request Trigger:
- Method: POST
- URL: (Generated URL)
- Parse JSON Action:
- Content:
Bodyfrom the HTTP trigger - Schema:
{
  "type": "array",
  "items": {
    "type": "object",
    "properties": {
      "id": { "type": "integer" },
      "name": { "type": "string" },
      "email": { "type": "string" }
    }
  }
}
- Content:
- Create CSV Table Action:
- From: Output of Parse JSON
- Columns:
Id,Name,Email
- Create Send Email Action:
- Email content: Output of Create CSV table
- File name:
data.csv
Testing the Workflow
Use a tool like Postman to send a POST request to the HTTP trigger URL with the following JSON payload:
[
  { "id": 101, "name": "Priya Singh", "email": "priya@example.com" },
  { "id": 102, "name": "Jane Smith", "email": "jane@example.com" }
]
Sample CSV Output
The resulting CSV file will look like this:
Id,Name,Email
101,Priya Singh,priya@example.com
102,Jane Smith,jane@example.com
This workflow is highly customizable and can be adapted to various use cases. Let me know if you need further assistance!
You can download the logic app template from the estudy247 GitHub repository – la-test-csvtable-10