Create HTML table in Logic App workflow
To create a Logic App workflow that uses a Recurrence trigger, initializes a variable with JSON data, creates an HTML table, and sends an email with the table, follow the step-by-step guide below.
Step-by-Step Workflow
Step1: Create a Logic App
- Go to the Azure portal.
- Click on Create a resource > Integration > Logic App.
- Provide a name, subscription, resource group, and location for your Logic App.
- Click Review + create and then Create.
Step 2: Add a Recurrence Trigger
- Open your Logic App in the designer.
- Search for the Recurrence trigger and add it.
- Configure the recurrence interval (e.g., every day, every hour, etc.).
- Interval: 1
- Frequency: Day (or Hour, depending on your requirement)
Step 3: Initialize a Variable with JSON Data
- Add a new action after the Recurrence trigger.
- Search for Initialize variable and add it.
- Configure the variable:
- Name:
jsonData - Type:
String - Value: Paste your JSON data as a string. For example:
[
  { "id": 101, "name": "Priya Singh", "email": "priya@example.com" },
  { "id": 102, "name": "Jane Smith", "email": "jane@example.com" }
]
- Name:
Step 4: Parse JSON Data
- Add a new action after the Initialize variable action.
- Search for Parse JSON and add it.
- In the Content field, select the
jsonDatavariable. - Provide a JSON schema for the data. For example:
{
  "type": "array",
  "items": {
    "type": "object",
    "properties": {
      "id": { "type": "integer" },
      "name": { "type": "string" },
      "email": { "type": "string" }
    }
  }
}
Step 5: Create an HTML Table
- Add a new action after the Parse JSON action.
- Search for Create HTML table and add it.
- In the From field, select the output of the Parse JSON action.
- The Logic App will automatically detect the columns (
id,name,email) from the JSON data and create an HTML table.
Step 6: Send an Email with the HTML Table
- Add a new action after the Create HTML table action.
- Search for Gmail (or your email provider) and select Send email (V2).
- Connect to your email account.
- Fill in the email details:
- To: Recipient email address
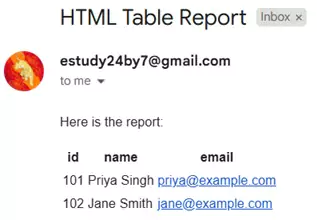
- Subject:
HTML Table Report - Body: Insert the output of the Create HTML table action.
- Optionally, you can format the email body with additional text. For example:
Here is the report:
@{body('Create_HTML_table')}
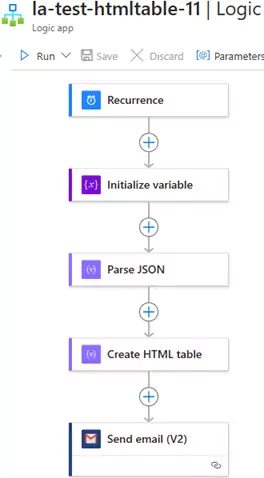
Here's how Logic App should look:
Testing the Workflow
- Save and run the Logic App.
- The workflow will:
- Trigger based on the recurrence schedule.
- Initialize the JSON data.
- Parse the JSON and create an HTML table.
- Send an email with the HTML table.
Sample HTML Table Output
The resulting HTML table will look like this:
You can download the logic app template from the estudy247 GitHub repository – la-test-htmltable-11