Workflow triggered by recurrence that connects to on-premises file systems in Azure Logic Apps
To get a file from a local (on-premises) folder using a Logic App, you need to set up an On-Premises Data Gateway and then configure your Logic App to use it.
Step-by-Step Guide
- Set Up On-Premises Data Gateway:
- The first step is to set up an On-Premises Data Gateway. This gateway allows Azure Logic Apps to securely communicate with on-premises data sources.
- Download and install the On-Premises Data Gateway from the Microsoft Download Center.
- Configure the gateway following the setup instructions, and make sure it’s running and connected to your Azure subscription.
- Create a Logic App:
- In the Azure portal, create a new Logic App.
- Add a Trigger:
- Add a trigger based on how you want to start the Logic App. For example, you could use a Recurrence trigger to run the app on a schedule.
- Set Up File System Connector:
- Add a new action and search for “File System“.
- Choose the action for your requirement – Get File Content.
- Configure Connection to On-Premises Folder:
- Set up a connection to the on-premises folder by selecting the previously configured On-Premises Data Gateway.
- Provide the necessary details such as file path, authentication method, etc.
- Process the File:
- Depending on what you want to do with the file, add actions to process the file content. For example, you could save the file to Azure Blob Storage, send it via email, or process the content further to local folder using action- Create file.
- Save and Test:
- Save your Logic App and test it to ensure it retrieves the file from the on-premises folder and saves it to the on-premises Out folder correctly
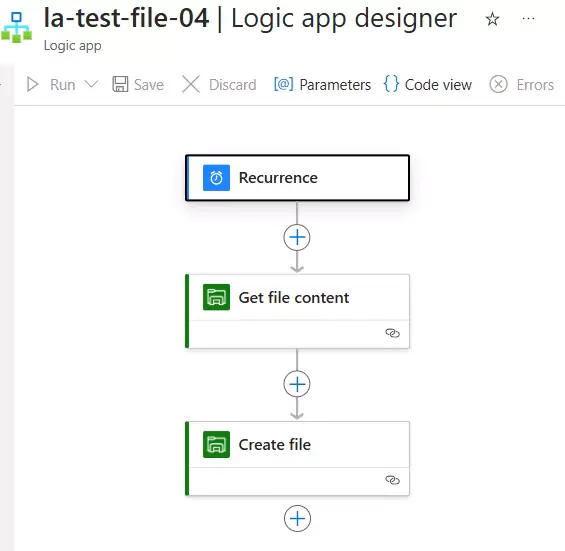
Here's how your Logic App should look:
You can download the logic app template from the estudy247 GitHub repository – la-test-file-04