Custom Receive Pipeline for Unzip File in BizTalk

Here are the steps to process a unzip file in BizTalk orchestration using a custom pipeline component:
1. Open Microsoft Visual Studio as an administrator user and click on File > New > Project. In the Installed Templates, click on BizTalk Projects, then Empty BizTalk Server Project and name it “BizTalkLive.Unzip.Disassemble”. Click OK.
2. Now, right-click on your solution and add a new C# class library project named “BizTalkLive.UnZip”. Rename the class1 as “UnZip”.
3. Add the dll reference of Ionic to use the unzip method in the pipeline disassembler stage. Also, add the reference Microsoft.BizTalk.Pipeline to use the pipeline method. At the end of this post, you will be able to download Ionic.dll or it is an open-source library, which you can download from another website.
using Microsoft.BizTalk.Message.Interop;
using Microsoft.BizTalk.Component.Interop;
usig Ionic.Zip;

namespace BizTalkLive.UnZip
{
//Attributes of class
[ComponentCategory(CategoryTypes.CATID_PipelineComponent)]
[ComponentCategory(CategoryTypes.CATID_DisassemblingParser)]
//Generate unique identifier
[System.Runtime.InteropServices.Guid(“F7EA6794-5E97-4E20-9C4B-EA9C3FD10FA9”)]
public class UnZip : IBaseComponent, IComponentUI, IDisassemblerComponent, IPersistPropertyBag
{
private string _ShemaMessageType;
private string _PropertyNamespace;
public string ShemaMessageType
{
get
{
return _ShemaMessageType;
}
set
{
_ShemaMessageType = value;
}
}
public void Disassemble(IPipelineContext pc, IBaseMessage inmsg)
{
//Microsoft.BizTalk.CAT.BestPractices.Framework.Instrumentation.TraceManager.WorkflowComponent.TraceInfo(“TSAUnZipDecode : Unzip process has started at ” + DateTime.Now.ToLongDateString());
Byte[] TextFileBytes = null;
string FileStatus = “0”;
string extension = “”;
string strReceivePortName = “”;
string strReceivedFileName = “”;
string _filename = “”;
IBaseMessagePart msgBodyPart1 = inmsg.BodyPart;
Stream msgBodyPartStream1 = msgBodyPart1.GetOriginalDataStream();
MemoryStream memStream1 = new MemoryStream();
byte[] buffer1 = new Byte[1024];
int bytesRead1 = 1024;
while (bytesRead1 != 0)
{
bytesRead1 = msgBodyPartStream1.Read(buffer1, 0, buffer1.Length);
memStream1.Write(buffer1, 0, bytesRead1);
}
IBaseMessage outMessage1;
outMessage1 = pc.GetMessageFactory().CreateMessage();
outMessage1.AddPart(“Body”, pc.GetMessageFactory().CreateMessagePart(), true);
memStream1.Position = 0L;
outMessage1.BodyPart.Data = memStream1;
if (this.ShemaMessageType != null)
{
outMessage1.Context.Promote(“MessageType”, “http://schemas.microsoft.com/BizTalk/2003/system-properties”, this.ShemaMessageType);
}
outMessage1.Context.Promote(“FileExtension”, PropertyNamespace, “.zip”);
IBaseMessageContext context = inmsg.Context;
strReceivePortName = context.Read(“ReceivePortName”, “http://schemas.microsoft.com/BizTalk/2003/system-properties”).ToString();
strReceivedFileName = context.Read(“ReceivedFileName”, “http://schemas.microsoft.com/BizTalk/2003/file-properties”).ToString();
strReceivedFileName = strReceivedFileName.Substring(strReceivedFileName.LastIndexOf(“\\”) + 1);
strReceivedFileName = ((string)strReceivedFileName).Replace(“.zip”, “”);
outMessage1.Context.Promote(“ReceivedFileName”, “http://schemas.microsoft.com/BizTalk/2003/file-properties”, strReceivedFileName);
outMessage1.Context.Promote(“ReceivePortName”, “http://schemas.microsoft.com/BizTalk/2003/system-properties”, strReceivePortName);
//outMessage1.Context = PipelineUtil.CloneMessageContext(inmsg.Context);
OutFiles.Enqueue(outMessage1);
The code mentioned above uses the interfaces IBaseMessage and IBaseMessageContext to receive the port name and file name. It also adds the original zip message to the Enqueue method of System.Collections.Queue and promotes message context FileExtension and MessageType. The aim is to store the original zip file in a local folder using message routing.
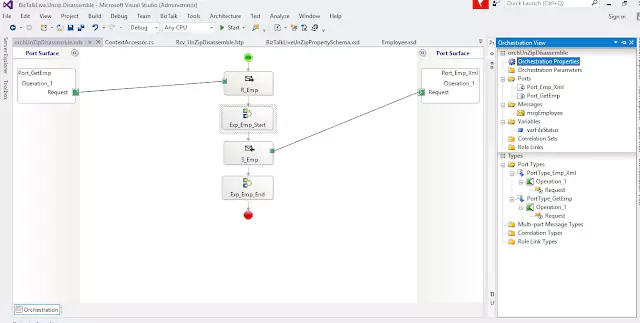
7. In the Disassemble method, the code unzips the zip file and enqueues the xml file in System.Collections.Queue. It also promotes the message type of the xml and some property promotion value, which can be used in the expression shape of the orchestration.
IBaseMessagePart msgBodyPart_XML = inmsg.BodyPart;
IBaseMessage outMessage;
if (msgBodyPart_XML != null)
{
Stream msgBodyPartStream = msgBodyPart_XML.GetOriginalDataStream();
msgBodyPartStream.Position = 0L;
if (msgBodyPartStream != null)
{
using (ZipInputStream zipInputStream = new ZipInputStream(msgBodyPartStream))
{
ZipEntry entry = zipInputStream.GetNextEntry();
while (entry != null)
{
Stream memStream = new MemoryStream();
byte[] buffer = new Byte[4096];
int bytesRead = 4096;
while (bytesRead != 0)
{
bytesRead = zipInputStream.Read(buffer, 0, buffer.Length);
memStream.Write(buffer, 0, bytesRead);
}
//Creating custom context property to hold extension of file
extension = entry.FileName.Substring(entry.FileName.IndexOf(“.”)).ToUpper();
_filename = entry.FileName.ToString();
if (extension == “.XML”)
{
FileStatus = “1”;
outMessage = pc.GetMessageFactory().CreateMessage();
outMessage.AddPart(“Body”, pc.GetMessageFactory().CreateMessagePart(), true);
memStream.Position = 0L;
outMessage.BodyPart.Data = memStream;
outMessage.Context = PipelineUtil.CloneMessageContext(inmsg.Context);
if (this.ShemaMessageType != null)
{
outMessage.Context.Promote(“MessageType”, “http://schemas.microsoft.com/BizTalk/2003/system-properties”, this.ShemaMessageType);
}
_filename = ((string)_filename).Replace(“.xml”, “”);
outMessage.Context.Promote(“ReceivedFileName”, “http://schemas.microsoft.com/BizTalk/2003/file-properties”, _filename);
outMessage.Context.Promote(“FileStatus”, PropertyNamespace, FileStatus.ToString());
outMessage.Context.Promote(“FileExtension”, PropertyNamespace, extension.ToLower());
OutFiles.Enqueue(outMessage);
}
else
{
FileStatus = “0”;
//outMessage.Context.Promote(“FileStatus”, PropertyNamespace, FileStatus.ToString());
//outMessage.Context.Promote(“FileExtension”, PropertyNamespace, extension.ToLower());
}
entry = zipInputStream.GetNextEntry();
}
}
}
}
}
public IBaseMessage GetNext(IPipelineContext pContext)
{
if (OutFiles.Count > 0)
{
return (IBaseMessage)OutFiles.Dequeue();
}
else
{
return null;
}
}
In the above code, there is an IBaseMessage method called GetNext() which dequeues all messages one by one in the pipeline. This allows us to easily route the message either in an orchestration or direct to a send port.
8. Right-click on the same project, BizTalkLive.UnZip, and then click on “Property”. After clicking on the “Sign” tag, add a new strong name file. Now, right-click on the same project and build it.
9. Go to the folder location and navigate to bin\Debug. Install the Ionic and UnZip DLL in GAC. You can reference how to install a DLL in GAC by following the instructions in this link: Install DLL into GAC.
10. To move to the next step, right-click on the solution of the same project and add a new class library of C# called “BizTalkLive.ContextPropertyAccessor“. This will call the property promoted value in BizTalk orchestration expression shape. Please see the following code, then build this project, and finally install the DLL in GAC.
using Microsoft.XLANGs.BaseTypes;
using Microsoft.XLANGs.Core;
using System;
using System.Collections;
namespace BizTalkLive.ContextPropertyAccessor
{
public class ContextAccessor
{
public static Hashtable GetContext(XLANGMessage message)
{
try
{
foreach (Segment segment in Service.RootService._segments)
{
IDictionary fields =
Context.FindFields(
typeof(XLANGMessage)
, segment.ExceptionContext);
foreach (DictionaryEntry field in fields)
{
XMessage msg = (field.Value as XMessage);
if (msg == null)
continue;
if (String.Compare(msg.Name, message.Name) != 0)
continue;
return msg.GetContextProperties();
}
}
}
catch (Exception ex)
{
// do not provoke failure
throw ex;
}
return new Hashtable();
}
public static string GetContextProperty(XLANGMessage message, string PropertyName, string PropertyNamespace)
{
string Property = “False”;
try
{
Microsoft.XLANGs.BaseTypes.XmlQName qname = new XmlQName(PropertyName, PropertyNamespace);
foreach (Segment segment in Service.RootService._segments)
{
IDictionary fields =
Context.FindFields(
typeof(XLANGMessage)
, segment.ExceptionContext);
foreach (DictionaryEntry field in fields)
{
XMessage msg = (field.Value as XMessage);
if (msg == null)
continue;
if (String.Compare(msg.Name, message.Name) != 0)
continue;
if (msg.GetContextProperties().ContainsKey(qname))
{
// get the property from GetContextProperties
Property = msg.GetContextProperties()[qname].ToString();
}
else if (msg.GetContentProperties().ContainsKey(qname))
{
// get the property from GetContentProperties
Property = msg.GetContentProperties()[qname].ToString();
}
return Property;
}
}
}
catch (Exception ex)
{
throw ex;
// do not provoke failure
// probably best to add some logging here
}
return Property;
}
}
}

12. To add a new receive pipeline named “Rcv_UnZipDisassemble“, follow these steps: 1. Click on the toolbox of the receive pipeline. 2. Right-click and select “Choose Items”. 3. Select the “BizTalk Pipeline Component” tag and click the “Browse” button on the bottom right. 4. Choose “BizTalkLive.UnZip.dll” from the already installed GAC assembly. 5. A new toolbox named “unzip_Disassembler” will be added to the pipeline toolbox. Select it and place it on the disassemble stage. 6. Add an XML disassembler after placing the toolbox.
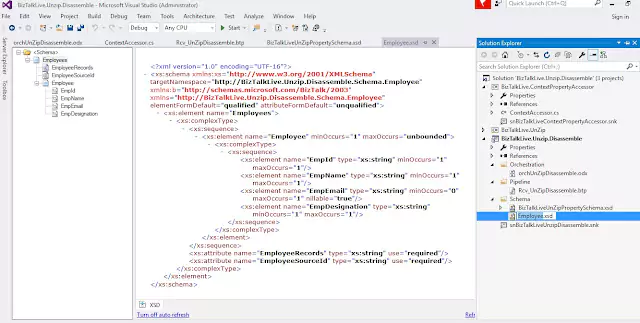
13. To proceed further, add two schemas – one property schema and one schema for the XML file that is unzipped from the zip file. You can refer to the following picture for a better understanding, or download the complete source from the link provided at the end of this post, which will help you to create both schemas easily.


16. To achieve the desired outcome, you need to create two send ports. The first send port should route the same ZIP file to a local directory using the filter condition that was promoted in the UnZip disassemble method i.e. file extension ‘a d’ receive port. The second send port should be used to copy all XML files to a local folder. Please refer to the picture below for better understanding.

To download the Ionic DLL, please click on this link – Download Ionic DLL.
To download the complete project source code, please click on this link – Download Source Code.
