Schema as Web Service- Example with a BizTalk Project
Please follow the steps below to create a BizTalk solution, i.e., host schema as a web service.
To create a “BizTalkLive.WS.Schema” project, follow these steps:
Step 1: Open Visual Studio as an administrator. From the “File” menu, select “New” and then “Project”. Click on the “BizTalk Projects” tab on the left side and select “Empty BizTalk Server Project” from the middle. In the “Name” section, set the project name as “BizTalkLive.WS.Schema” and the same solution name. Then click the “OK” button.
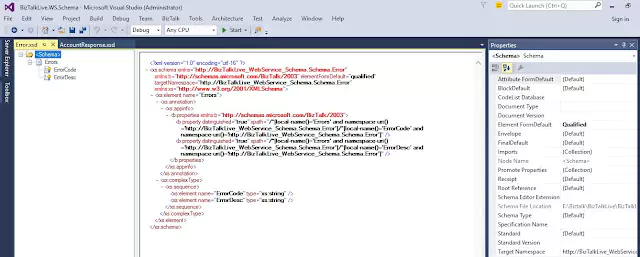
Step 2: Right-click on your project in Visual Studio and add two folders – “Orchestration” and “Schema” – one by one. Then, right-click on the “Schema” folder and add three schemas – one for the web service request, one for the web service response, and the last one to handle custom fault error. If an error occurs, get it back to the client-server.
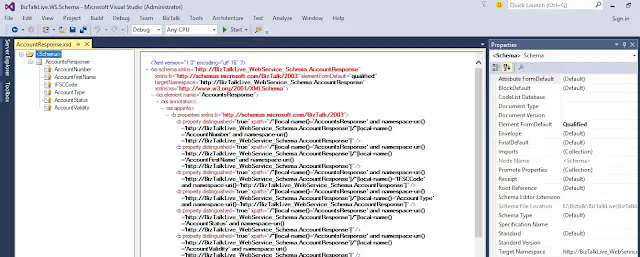
The name of the web service request schema is “AccountRequest.xsd”, and the schema structure should be configured accordingly.

<?xml version="1.0" encoding="utf-16" ?>
<xs:schema xmlns="http://BizTalkLive_WebService_Schema.AccountRequest" xmlns:b="http://schemas.microsoft.com/BizTalk/2003" elementFormDefault="qualified" targetNamespace="http://BizTalkLive_WebService_Schema.AccountRequest" xmlns:xs="http://www.w3.org/2001/XMLSchema">
<xs:element name="AccountsRequest">
<xs:complexType>
<xs:sequence>
<xs:element name="AccountNumber" type="xs:string" />
<xs:element name="IFSCCode" type="xs:string" />
</xs:sequence>
</xs:complexType>
</xs:element>
</xs:schema>
<?xml version=”1.0″ encoding=”utf-16″ ?>
<xs:schema xmlns=”http://BizTalkLive_WebService_Schema.AccountResponse“ xmlns:b=”http://schemas.microsoft.com/BizTalk/2003“ elementFormDefault=”qualified“ targetNamespace=”http://BizTalkLive_WebService_Schema.AccountResponse“ xmlns:xs=”http://www.w3.org/2001/XMLSchema“>
<xs:element name=”AccountsResponse“><xs:annotation><xs:appinfo>
<b:properties xmlns:b=”http://schemas.microsoft.com/BizTalk/2003“>
<b:property distinguished=”true“ xpath=”/*[local-name()=’AccountsResponse’ and namespace-uri()=’http://BizTalkLive_WebService_Schema.AccountResponse’]/*[local-name()=’AccountNumber’ and namespace-uri()=’http://BizTalkLive_WebService_Schema.AccountResponse’]” />
<b:property distinguished=”true“ xpath=”/*[local-name()=’AccountsResponse’ and namespace-uri()=’http://BizTalkLive_WebService_Schema.AccountResponse’]/*[local-name()=’AccountFirstName’ and namespace-uri()=’http://BizTalkLive_WebService_Schema.AccountResponse’]” />
<b:property distinguished=”true“ xpath=”/*[local-name()=’AccountsResponse’ and namespace-uri()=’http://BizTalkLive_WebService_Schema.AccountResponse’]/*[local-name()=’IFSCCode’ and namespace-uri()=’http://BizTalkLive_WebService_Schema.AccountResponse’]” />
<b:property distinguished=”true“ xpath=”/*[local-name()=’AccountsResponse’ and namespace-uri()=’http://BizTalkLive_WebService_Schema.AccountResponse’]/*[local-name()=’AccountType’ and namespace-uri()=’http://BizTalkLive_WebService_Schema.AccountResponse’]” />
<b:property distinguished=”true“ xpath=”/*[local-name()=’AccountsResponse’ and namespace-uri()=’http://BizTalkLive_WebService_Schema.AccountResponse’]/*[local-name()=’AccountStatus’ and namespace-uri()=’http://BizTalkLive_WebService_Schema.AccountResponse’]” />
<b:property distinguished=”true“ xpath=”/*[local-name()=’AccountsResponse’ and namespace-uri()=’http://BizTalkLive_WebService_Schema.AccountResponse’]/*[local-name()=’AccountValidity’ and namespace-uri()=’http://BizTalkLive_WebService_Schema.AccountResponse’]” />
</b:properties></xs:appinfo></xs:annotation><xs:complexType>
<xs:sequence minOccurs=”1“ maxOccurs=”1“>
<xs:element name=”AccountNumber“ type=”xs:string” /><xs:element name=”AccountFirstName“ type=”xs:string” />
<xs:element name=”IFSCCode“ type=”xs:string” /><xs:element name=”AccountType“ type=”xs:string” />
<xs:element name=”AccountStatus“ type=”xs:string” /><xs:element name=”AccountValidity“ type=”xs:string” />
</xs:sequence></xs:complexType></xs:element></xs:schema>
<?xml version=”1.0″ encoding=”utf-16″ ?>
<xs:schema xmlns=”http://BizTalkLive_WebService_Schema.Schema.Error“ xmlns:b=”http://schemas.microsoft.com/BizTalk/2003“ elementFormDefault=”qualified“ targetNamespace=”http://BizTalkLive_WebService_Schema.Schema.Error“ xmlns:xs=”http://www.w3.org/2001/XMLSchema“>
<xs:element name=”Errors“><xs:annotation><xs:appinfo>
<b:properties xmlns:b=”http://schemas.microsoft.com/BizTalk/2003“>
<b:property distinguished=”true“ xpath=”/*[local-name()=’Errors’ and namespace-uri()=’http://BizTalkLive_WebService_Schema.Schema.Error’]/*[local-name()=’ErrorCode’ and namespace-uri()=’http://BizTalkLive_WebService_Schema.Schema.Error’]” />
<b:property distinguished=”true“ xpath=”/*[local-name()=’Errors’ and namespace-uri()=’http://BizTalkLive_WebService_Schema.Schema.Error’]/*[local-name()=’ErrorDesc’ and namespace-uri()=’http://BizTalkLive_WebService_Schema.Schema.Error’]” />
</b:properties></xs:appinfo></xs:annotation><xs:complexType><xs:sequence>
<xs:element name=”ErrorCode“ type=”xs:string” /><xs:element name=”ErrorDesc“ type=”xs:string” />
</xs:sequence></xs:complexType></xs:element></xs:schema>

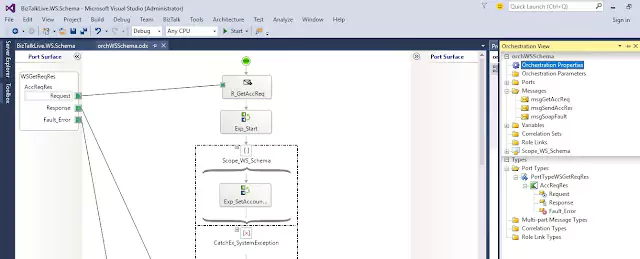
In the above picture, I have created a new request-response port and added a fault message that will be sent back to the destination system in case of any errors during the process. You can add multiple fault messages to the same request-response port as per your requirement. On the right, you can see variables, which I will discuss later. Now, create a new message and assign the schema name, as shown on the right side in the orchestration view.
Please take a look at the values of the expression shape, i.e., Exp_SetAccountRes, Exp_SystemException, and Exp_GeneralException, respectively.
Exp_SetAccountRes:
System.Diagnostics.EventLog.WriteEntry("Account: ","Account response has assigned",System.Diagnostics.EventLogEntryType.Information,1);
varSuccess=true;
varAccountFirstName="Jitendra";
varAccountStatus="A";
varAccountType="SB";
varAccountValidity="V";
//varNumber =1/System.Convert.ToInt32(varAccountStatus); //Rremove "//" string to get system exception
Exp_SystemException:
varSuccess=false;
varErrorCode = "101";
varErrorDesc = objSystemException.Message.ToString();
System.Diagnostics.EventLog.WriteEntry("WSSchema: ","Receive System error : "+varErrorDesc+"-"+varErrorCode);
Exp_GeneralException:
System.Diagnostics.EventLog.WriteEntry("WSSchema: ","Receive General Exception");
varSuccess=false;
varErrorCode = "103";
varErrorDesc = "Received General Error";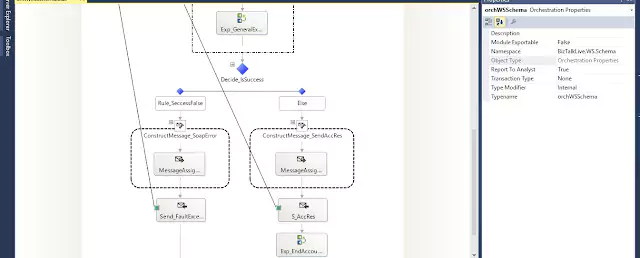
Message Assignment Shape for Fault Message-
varSaopXml = new System.Xml.XmlDocument();
varSaopXml.LoadXml("<ns0:Errors xmlns:ns0='http://BizTalkLive_WebService_Schema.Schema.Error'>"+
  "<ns0:ErrorCode>ErrorCode_0</ns0:ErrorCode>"+
  "<ns0:ErrorDesc>ErrorDesc_0</ns0:ErrorDesc>"+
  "</ns0:Errors>");
msgSoapFault = varSaopXml;
msgSoapFault.ErrorCode = varErrorCode.ToString();
msgSoapFault.ErrorDesc = varErrorDesc.ToString();
System.Diagnostics.EventLog.WriteEntry("WSSchema: ","Send Soap Exception "+varErrorDesc);
Message Assignment Shape for Response Message-
System.Diagnostics.EventLog.WriteEntry("WSSchema: ","Account res has started for construction");
varGetXML = new System.Xml.XmlDocument();
varGetXML.LoadXml("<ns0:AccountsResponse xmlns:ns0='http://BizTalkLive_WebService_Schema.AccountResponse'>"+
  "<ns0:AccountNumber>AccountNumber_0</ns0:AccountNumber>"+
  "<ns0:AccountFirstName>AccountFirstName_0</ns0:AccountFirstName>"+
  "<ns0:IFSCCode>IFSCCode_0</ns0:IFSCCode>"+
  "<ns0:AccountType>AccountType_0</ns0:AccountType>"+
  "<ns0:AccountStatus>AccountStatus_0</ns0:AccountStatus>"+
  "<ns0:AccountValidity>AccountValidity_0</ns0:AccountValidity>"+
  "</ns0:AccountsResponse>");
System.Diagnostics.EventLog.WriteEntry("WSSchema: ","Account res has initiated to assign account response");
msgSendAccRes =varGetXML;
msgSendAccRes.AccountFirstName=varAccountFirstName.ToString();
msgSendAccRes.AccountNumber=xpath(msgGetAccReq,"string(/*[local-name()='AccountsRequest' and namespace-uri()='http://BizTalkLive_WebService_Schema.AccountRequest']/*[local-name()='AccountNumber' and namespace-uri()='http://BizTalkLive_WebService_Schema.AccountRequest'])");
Step 5: To create a schema as a web service project in BizTalk, right-click on the BizTalk project in Visual Studio and select “Properties”. Then, select “Signing” from the tab list on the right-hand side and create a new strong name key named “snBizTalkLiveWSSchema.snk”. Next, go to the “Deployment” tab and set the application name as “BizTalkLive.WS.Schema”. Finally, right-click on the project and build it before deploying it.
By following the above steps, you can create a schema as a web service project in BizTalk. You can also check out the following link for instructions on how to publish a web service in BizTalk using the Publishing Wizard: publish web service.