Below are the prerequisites for implementing JSON messages in BizTalk:
- Visual Studio
- BizTalk Server 2013R2 or later version
- Basic knowledge of JSON
- Basic understanding of programming in BizTalk and deployment
I will guide you on how to receive a JSON message using the JSON decoder tool in the receive pipeline, and also on how to send a JSON message using the JSON encoder tool in the send pipeline, in BizTalk. Please follow the steps below to accomplish the task without wasting your time.
To begin with, open Microsoft Visual Studio and create a new BizTalk project named ‘BizTalkLive_JSONExample1’. Once you have created the project, right-click on it and select ‘Properties’. From the ‘Deployment’ tab, set the application name as ‘BizTalkLive_JSONExample1’. Additionally, you need to create a strong name key in the ‘Signing’ tab with the name ‘snBizTalkLive_JSONExample1.snk’. You can refer to the provided image for better understanding.
Firstly, I have created a simple input schema containing a list of employee names. The schema consists of a root element called “Employees”, which has a child element called “Employee”. Within the “Employee” element, there are two child elements called “fName” and “lName”, which represent the first and last names of the employee respectively. Please refer to the image below for a better understanding.
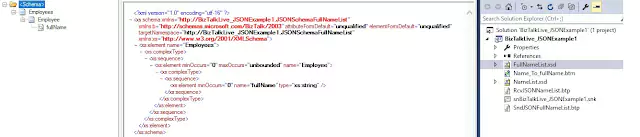
I have created an output schema for the list of full names of employees. The schema consists of a root element called “Employees”, which includes a child element named “Employee” with one record. Finally, within this record, there is a child element named “fullName”. Please refer to the image below for a visual representation of this output schema.
Now, create a map named ‘Name_To_fullName.btm’. Select the source schema ‘NameList.xsd’ and the destination schema ‘FullNameList.xsd’. Map both schemas as shown in the picture below.
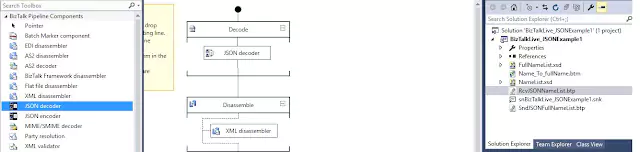
As we all know, in BizTalk, the internal flow of messages is only in XML format. Therefore, I need a receive pipeline that can decode JSON messages to XML format. To create this pipeline, I suggest naming it ‘RcvJSONNameList.btp’. Then, select the JSON decoder tool from the pipeline toolbox and drop it in the Decode stage of the pipeline. Three pipeline component properties need to be configured-
- Add Message Body For Empty Message – True or False ==> if it true, for empty message, ‘{}’ will be added as message body. I do not want to add ‘{}’ for empty message so will set as false value for it.
- Root Node – Root name of my input schema after conversion of JSON message to XML format in my case it is ‘Employees’.
- Root Node Namespace- Target namespace of my input schema in my case this value is ‘http://BizTalkLive_JSONExample1.JSONSchemaNameList’
A receive pipeline can also be created after deploying the BizTalk application. Refer to the image below for more information.
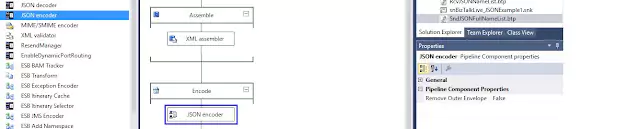
To encode an XML message to JSON, you need to create a send pipeline and name it ‘SndJSONFullNameList.btp’. Then, select the JSON encoder tool from the pipeline toolbox and drop it in the Encode stage of the pipeline. There is only one pipeline component property called ‘Remove Outer Envelope’, which can be set to either True or False. If it is set to True, the root element of the XML message will be ignored after encoding. In this case, it should be set to False. Please refer to the image below for guidance on creating the send pipeline
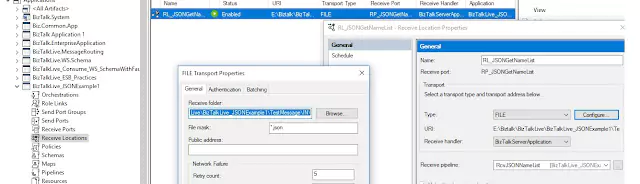
To begin, please build the BizTalk solution and deploy it. Next, create a receive port named ‘RP_JSONGetNameList’. Within this receive port, create a receive location named ‘RL_JSONGetNameList’ and select ‘File’ as the transport type. Then, choose a file handler and select the receive pipeline ‘RcvJSONNameList’, which has already been created to decode JSON to XML messages. Finally, click on the ‘Configure’ button and set the receive folder directory. Please refer to the picture below for guidance on how to create the receive location to receive JSON messages
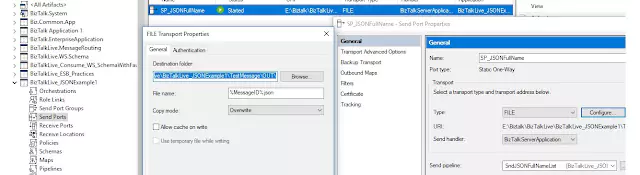
Create a send port named ‘SP_JSONFullName’, follow these steps:1. Select the transport type as ‘File’.
2. Choose the send pipeline ‘SndJSONFullNameList’ to encode XML messages to JSON.
3. Click on the configure button and set the destination folder path and file name as ‘%MessageID%.json’.
4. Click OK.Next, go to the Filters tab of the same send port and add a filter property of BTS.ReceivePortName==RP_JSONGetNameList. This will ensure that when a JSON message is published on the receive port, it will be subscribed by this send port.Finally, choose your MAP from the Outbound Maps tab section.Refer to the following picture for a visual representation of these instructions.
In the final step, please create a JSON file containing the list of employee names based on the input schema that I have provided. I have already created a file named ‘EmployeeNameList.json’. To create this file, please open Notepad and copy the JSON format text below. Then, save it as ‘EmployeeNameList.json’.
{
"Employee":[
{ "fName":"Esudy", "lName":"247" },
{ "fName":"Sushil", "lName":"Singh" },
{ "fName":"Jitendra", "lName":"Kumar" }
]
}