Publish a Web Service using BizTalk WCF Service Publishing Wizard

Welcome back to my blog! In this post, we’ll discuss how to publish a WCF web service in BizTalk. If you want to expose a web service, you can use the BizTalk WCF Service Publishing Wizard. This wizard guides you through the process of choosing what you want to expose as a web service. In a previous post, we covered how to host Schema as a Web Service. This section will walk you through the wizard step-by-step to publish a WCF Web Service using WCF-WSHttp.

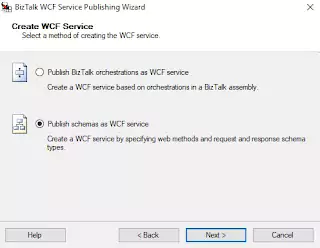
1. To begin the wizard, navigate to Start > All Programs > Microsoft BizTalk Server 2016 > BizTalk WCF Service Publishing Wizard. This will display a welcome screen, which you can proceed from by clicking Next. To avoid seeing the welcome screen in the future, you can check the box at the bottom to disable it. The next screen will resemble the one shown in the figure below.

2. Select the Service Endpoint option and choose the adapter you want to use. If you want to expose the service metadata, check the Enable Metadata Endpoint option. This will allow users to automatically browse to https://yourownserviceurl.com?wsdl and generate the proxy classes required to call the web service. If you check the Create BizTalk Receive Locations in the Following Application option, the wizard will create receive locations that match your choices. You can rename and reconfigure these receive locations later if needed.

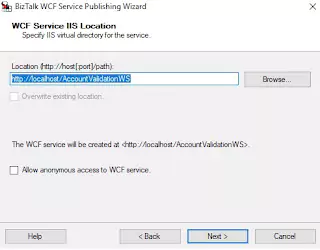
If you choose the Metadata Only Endpoint (MEX) option, you can publish a WCF service based on the current configuration of a receive location. However, you should only check the Enable Metadata Endpoint checkbox on development and test servers. On production servers, this information is not needed since all development against your service should be done in a development or test environment.

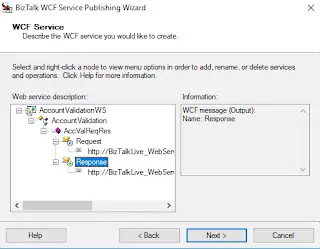
Finally, click Next to proceed to the next screen, which is displayed in the figure below.
3. On this screen, you have two options for exposing your orchestration: as a web service or as one or more schemas. If you choose to expose your orchestration as a web service, you must make sure that the port type used for the port you want to expose is public. However, it’s best to avoid exposing your orchestration as a web service because it creates a service that has an interface that is the message type of the message your orchestration receives. This creates a tight coupling between your exposed services and your internal business processes. The better option is to choose to expose one or more schemas. This will allow you to develop schemas to be used for the interface and then map them to and from these schemas in your two-way receive port.

4. To rename an element in the tree view, simply right-click it and choose the rename option. You can also delete a service or operation and replace it with something else. For example, if you want a one-way web service, you can remove Operation1, right-click the service, and choose Add Web Method, One-Way. The root node’s name becomes the default name for the virtual directory created for the web service in Internet Information Services (IIS). You should name the root node, service name, operation name, and message names appropriately. Additionally, you need to select types for the messages. To do this, right-click either the Request or the Response and select the Select Schema Type option. This will prompt a file selector, where you can locate the assembly containing the schema you want to use for that specific message. Below is an example image showing the selection of the request message schema that has already been deployed in the Global Assembly Cache (GAC).

I am working on creating a response message similar to what is shown in the picture.
After selecting both request and response message types, the complete view will be displayed. If any updates are required, the project needs to be redeployed and the GAC will be updated again.
5. After clicking on the “Next” button, you will be taken to a screen where you need to set a target namespace for the web service. It is important to note that this step does not affect the namespace of the XML that you will receive, and therefore does not affect the agreement between you and the sender. Please refer to the image below for further clarification.
6. After clicking Next, you will be taken to a screen where you can choose the deployment location for the web service, as shown in Figure.
7. BizTalk web services need to be hosted on a BizTalk Server and can be accessed through a virtual directory named “AccountValidationWS,” which is located at the root of the localhost website. If you have previously published a web service to this URL, you can choose to overwrite the existing location by selecting the “Overwrite Existing Location” check box. Additionally, you must decide whether to allow anonymous access to the web service. If anonymous access is not allowed, then integrated security is required for the web service. Finally, after making these choices, click Next to review a summary of your selections.
8. After clicking the “Create” button, click on “Finish” to exit the wizard.

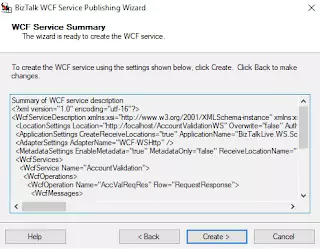
After you have published your web service, there are two important things that you need to ensure. Firstly, the IIS application pool that your virtual directory is set to run under must run as a user who is a member of the BizTalk Isolated Host Users group. Secondly, you need to make sure that the host assigned to the receive location is the one you intended to use.

You may refer to this link for guidance on configuring the settings for your web service in both IIS and BizTalk: Configure Setting in IIS and BizTalk for Web Service.

Post a comment

Leave a Comment

Scroll to Top