Custom Send Pipeline for Zip File in BizTalk
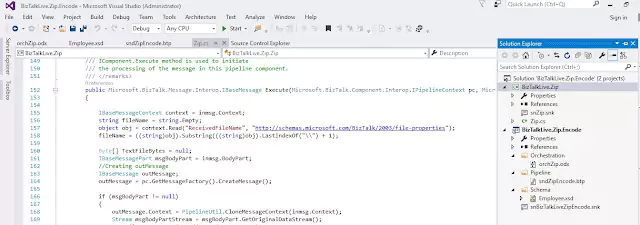
Please follow the steps below to learn how to send a zip file using a custom send pipeline component:
1. Open Microsoft Visual Studio as an Administrator user, click on File, then New, then Project. In the Installed Templates section, click on BizTalk Projects, then choose Empty BizTalk Server Project. Name it “BizTalkLive.Zip.Encode” and click OK.
2. Leave everything else as is for now. Right-click on your solution and create a new C# class library project named “BizTalkLive.Zip”. Then, rename class1 as “Zip”.
3. Add a DLL reference of Ionic so that you can use the zip method in the pipeline Encode stage. Also, add a reference to Microsoft.BizTalk.Pipeline so that you can use pipeline method. You can download the Ionic.dll from an open source library website.
using Ionic.Zip;
using Microsoft.BizTalk.Component.Interop;
using Microsoft.BizTalk.Message.Interop;
using System;
using System.Collections;
using System.Collections.Generic;
using System.IO;
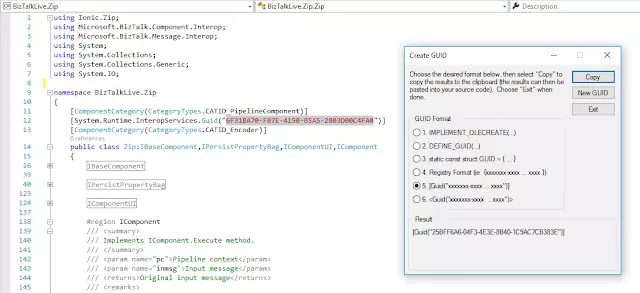
namespace BizTalkLive.Zip
{
[ComponentCategory(CategoryTypes.CATID_PipelineComponent)]
[System.Runtime.InteropServices.Guid(“6F31BA70-F87E-4150-B5A5-2803D00C4FA0”)]
[ComponentCategory(CategoryTypes.CATID_Encoder)]
public Microsoft.BizTalk.Message.Interop.IBaseMessage Execute(Microsoft.BizTalk.Component.Interop.IPipelineContext pc, Microsoft.BizTalk.Message.Interop.IBaseMessage inmsg)
{
IBaseMessageContext context = inmsg.Context;
string fileName = string.Empty;
object obj = context.Read(“ReceivedFileName”, “http://schemas.microsoft.com/BizTalk/2003/file-properties”);
fileName = ((string)obj).Substring(((string)obj).LastIndexOf(“\\”) + 1);
Byte[] TextFileBytes = null;
IBaseMessagePart msgBodyPart = inmsg.BodyPart;
//Creating outMessage
IBaseMessage outMessage;
outMessage = pc.GetMessageFactory().CreateMessage();
if (msgBodyPart != null)
{
outMessage.Context = PipelineUtil.CloneMessageContext(inmsg.Context);
Stream msgBodyPartStream = msgBodyPart.GetOriginalDataStream();
TextFileBytes = ReadToEnd(msgBodyPartStream);
outMessage.AddPart(“Body”, pc.GetMessageFactory().CreateMessagePart(), true);
IDictionary<string, Byte[]> lst = new Dictionary<string, Byte[]>();
lst.Add(fileName, TextFileBytes);
MemoryStream ms;
using (ZipFile zip = new ZipFile())
{
foreach (KeyValuePair<string, Byte[]> item in (IDictionary<string, Byte[]>)lst)
{
zip.AddEntry(item.Key, item.Value);
}
ms = new MemoryStream();
ms.Seek(0, SeekOrigin.Begin);
zip.Save(ms);
}
ms.Position = 0;
outMessage.BodyPart.Data = ms;
outMessage.Context.Promote(“ReceivedFileName”, “http://schemas.microsoft.com/BizTalk/2003/file-properties”, fileName.Substring(0,fileName.IndexOf(“.”)));
}
return outMessage;
}
In the above code, I am using the IBaseMessageContext interface to retrieve the name of the received file.
6. To continue, right-click the BizTalkLive.Zip project and select Properties. From there, click on the Signing tab and add a new strong name file. Once this is done, right-click on the same project and select Build.
7. Next, navigate to the bin\Debug folder location and install the Ionic and Zip DLLs into the gac. You can find instructions on how to install a DLL into the gac in this article – Install DLL into GAC.
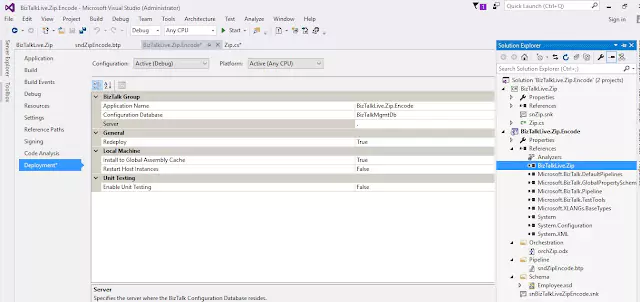
8. Now, create a new BizTalk project within the same solution and name it “BizTalkLive.Zip.Encode”. Reference the DLL from the gac (BizTalkLive.Zip) in the BizTalk project, as shown in the following image:
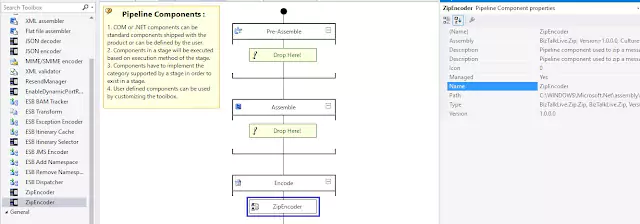


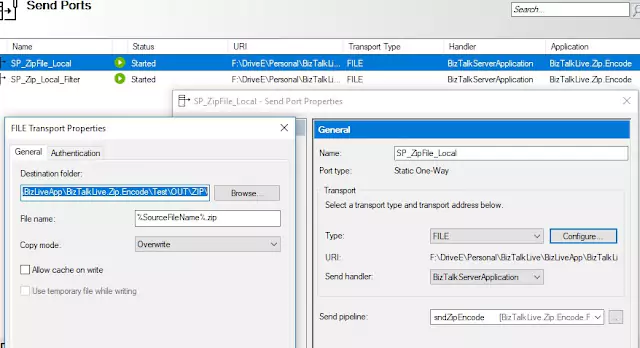
12. To complete the biztalk project zip custom send pipeline, follow these steps: 1. Right-click on the solution and set the same name of the biztalk project as its solution name. 2. Deploy the solution by right-clicking on it. 3. Create a receive port and a receive location. 4. Select PassThruReceive in the receive pipeline and click on the Configure button. 5. Set the receive folder path and click OK. 6. Create two send ports. 7. Use the filter condition of BTS property of receive port name to route the same XML file to the local directory in the first send port. 8. Enlist the second send port in orchestration logic send port. 9. Select the custom send pipeline that was created in the biztalk project to convert the file into a zip format.
Refer to the following picture for more clarity.
To download the Ionic DLL, please click on this link: Download Ionic DLL
Additionally, you can download the complete project source code by clicking on this link: Download Source Code
